A toilet flapper is a simple, flexible rubber or silicone valve inside the toilet tank that controls when water flows from the tank into the bowl during a flush. Its job is absolutely critical: it seals the opening at the bottom of the tank so the toilet can hold water in between flushes, then lifts up to let water swoosh down when you push the handle. Without a working flapper, your toilet can’t flush properly—it might leak, run, or waste gallons of water every day.
This small part carries a big responsibility for both your wallet and the environment. A faulty flapper is one of the main reasons toilets leak or run constantly, leading to higher water bills and unnecessary water waste. Learning how your toilet’s flapper works gives you the power to catch leaks early, save money, and keep your household plumbing running smooth. This knowledge is especially handy for anyone handy—or determined to become handier—around the house.
Understanding Toilet Flapper Basics
Before diving into the gears and guts of fixing a toilet, it’s helpful to get familiar with the basics of the toilet flapper—what it does, where it sits, and why it matters. Think of the flapper as the gatekeeper of your toilet’s flush cycle. It quietly does its job inside the tank, opening and closing at just the right moments so the toilet can refill and flush again with no leaks in between.
For folks new to DIY or plumbing, don’t worry—understanding the flapper isn’t rocket science. Every flush starts and ends with this humble little part, even though it’s hidden out of sight. Its job is to hold water in the tank and then release it quickly into the bowl, then snap shut again to let the tank refill. Simple, reliable, and usually maintenance-free—until it isn’t.
In the upcoming sections, there’s a closer look at where exactly the toilet flapper resides inside your tank and the other moving parts it works alongside. You’ll also see a clear, step-by-step breakdown of what happens to the flapper each time you flush, making it easy to spot signs of trouble and handle basic repairs. There’s no need for specialized tools or advanced skills—just a bit of patience and a willingness to pop off that tank lid and take a look.
Whether you’re curious about DIY plumbing or determined to stop your toilet from running up your water bill, understanding the flapper basics is step one. The details will break down each aspect, building your confidence no matter your starting point.
Toilet Flapper Location and Components Explained
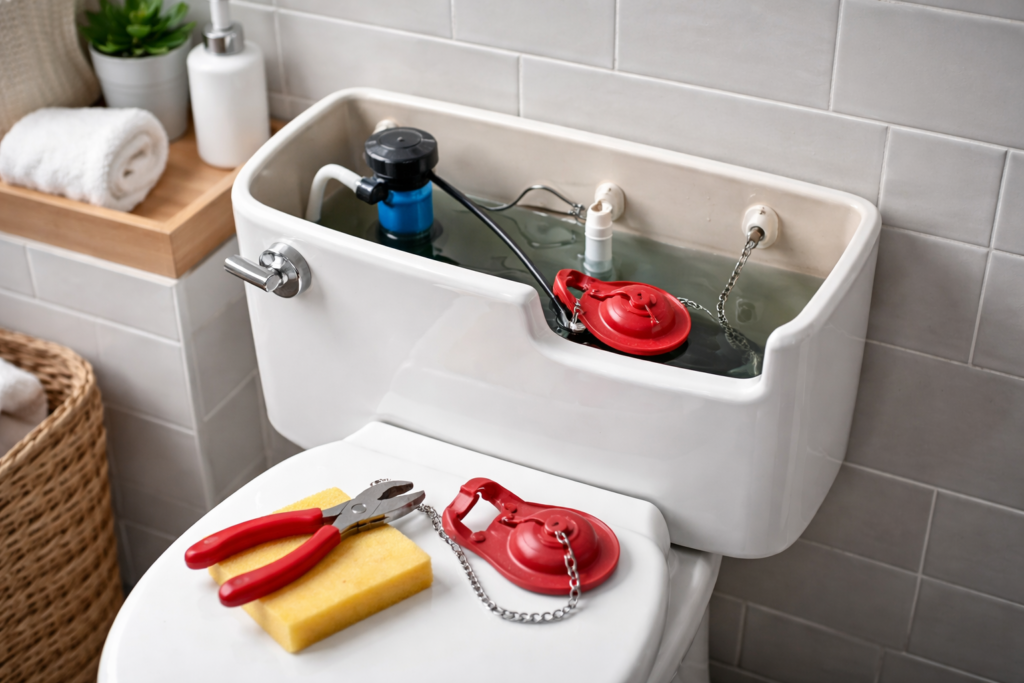
The toilet flapper lives inside the tank, right at the bottom center, attached to the flush valve opening. It’s typically a round, rubber or silicone disk hinged to posts on either side of the overflow tube. The overflow tube is the tall pipe that runs vertically near the center, and it prevents your tank from overfilling.
A chain connects the flapper to the flush handle lever, which is the arm that lifts the flapper when you push the toilet handle. The refill tube is a smaller tube that directs water back into the overflow tube during refill. Together, these parts make up the main components you’ll see when you peek inside your toilet tank—nothing too scary, and all easy to inspect without much effort.
How a Toilet Flapper Works in the Flush Cycle
During a flush, the handle lifts the chain, which raises the flapper off the flush valve seat. This lets water rush from the tank down into the toilet bowl, triggering the flush. Once the tank empties enough, the flapper drops back down, sealing the flush valve so the tank can refill without water leaking into the bowl.
The flapper’s ability to create a tight seal is what keeps your toilet from running endlessly or leaking water. If it doesn’t close all the way—or if it’s warped, dirty, or degraded—water will escape when it shouldn’t, leading to the common toilet woes many folks experience. Knowing this simple open-and-shut action can help you quickly spot trouble if your toilet starts acting up.
Common Toilet Problems Caused by Flapper Failure

If you’ve noticed your toilet making hissing sounds late at night or the tank constantly topping itself off, you might be dealing with a flapper gone bad. Faulty or worn toilet flappers are the top reason toilets run non-stop, leak, or waste water—issues that can quietly drive up water bills over time.
These problems aren’t just quirky annoyances. A running or leaky toilet can increase monthly costs, put stress on household plumbing, and even trigger water waste fines in areas with strict conservation rules. Tiny leaks from a warped or cracked flapper add up quicker than most people realize—sometimes wasting hundreds of gallons a week.
Learning to recognize these problems early puts you ahead of the game. Spotting symptoms like frequent running, tank noises, or higher-than-usual utility bills is a skill well worth having. Up next, the focus is on how to spot classic flapper issues—including why they happen, and how they show themselves in your bathroom—so you can act quickly and avoid larger plumbing headaches.
With a bit of know-how, you’re in prime position to nip these toilet troubles in the bud. Early attention means saving water, money, and some serious stress down the line. The following sections break down what to look for, making diagnosis quick and painless—even if you’ve never peeked inside a tank before.
Running Toilet Troubleshooting: Signs and Causes
- Constant water noises: If you keep hearing water flowing or trickling after you flush, odds are the flapper isn’t sealing properly. This is the most classic sign of a running toilet.
- Tank refills on its own: When your tank fills with no one using the toilet, that’s usually water slowly leaking past a worn-out flapper—causing the fill valve to kick in automatically over and over.
- Rising water bills: An unexplained jump in your monthly water cost often points to a hidden leak, which is very often a faulty or degraded flapper letting water escape constantly into the bowl.
- Chain stuck or tangled: Sometimes, the chain between the flush handle and flapper gets kinked, too long, or hooked around other parts, stopping the flapper from closing all the way after flushing.
Water Waste and How to Fix a Leaky Toilet Flapper
- Big water loss, small leak: A tiny leak from a warped or stiff flapper can waste 300 gallons of water per week or over 15,000 gallons a year—enough to spike your water bill by $100 or more annually. Larger leaks can waste even more, affecting both your wallet and the environment.
- Environmental impact: Wasted toilet water isn’t just about cost. Every gallon lost means extra pumps, treatment, and energy are used—which increases your home’s carbon footprint. Regular flapper checks make your home greener and keep your plumbing eco-friendly.
- How to check for leaks: Add a few drops of food coloring to the tank and wait 10–20 minutes without flushing. If color appears in the bowl, water is leaking past the flapper—time to act!
- Simple flapper fixes: In many cases, swapping out the old, crumbling flapper for a new one solves leaks instantly. Unsnap the old one, attach the new, and adjust the chain so the flapper moves freely. Test a flush to be sure it shuts tight each time.
- When to go further: If you still have leaks after a new flapper, check the flush valve seat for damage, debris, or mineral buildup—these can prevent even a brand-new flapper from sealing right.
Types of Toilet Flappers and Key Features
Toilet flappers come in a surprising variety of shapes, sizes, and materials. Picking the right one can be the difference between a one-and-done DIY job or a week of return trips to the hardware store. While most toilets use a standard rubber flapper, there are adjustable models, specialty types for modern toilets, and different materials that handle harsh water better or last longer.
It helps to understand the major differences between these options before buying a replacement. Not all flappers fit every toilet; some newer or brand-specific toilets demand specialized parts. It’s also worth knowing how material choices—like rubber, silicone, or composite—affect how long your new flapper will last, especially in homes with tough water conditions or chemical use in the tank.
Up next, you’ll get a closer look at the common types and materials available, so you’re not left guessing in the plumbing aisle. Plus, a breakdown of those compatibility challenges that have tripped up even veteran DIYers—like flush valve diameters, brand-specific shapes, and what happens if you try to put a standard flapper in a dual-flush or high-powered toilet.
With the right info, you can match the right flapper to your toilet the first time, minimize frustration, and make your next repair stick for years—not just weeks.
Comparing Common Toilet Flapper Types and Materials
- Standard Flappers: These are basic round rubber flappers, designed to fit most traditional toilets with a standard flush valve. They’re inexpensive, straightforward, and easy to find at any home store.
- Adjustable Flappers: These flappers feature dials or sliders to control the flush volume, ideal for saving water or compatible with high-efficiency toilets. Adjustable types work well when you need a precise fit or want better control.
- Specialty Flappers: Some modern toilets (dual-flush or pressure-assist) require unique flapper shapes or specialty seals—these are often brand- or model-specific. Always check your toilet’s brand and flush style before buying.
- Rubber vs. Silicone Flappers: Rubber is most common and budget-friendly, but can be damaged by chlorine, hard water, or tank cleaners. Silicone flappers cost a bit more but resist degrading, making them longer-lasting and ideal for homes with harsh water or chemical cleaners.
Toilet Flapper Compatibility and Universal Fit Challenges
- Different Flush Valve Sizes: Not all flappers fit every toilet. The diameter of the flush valve opening can be 2 inches (standard), 3 inches, or even different. Installing the wrong size means the flapper won’t seal, causing leaks and wasted water.
- Brand-Specific Shapes and Attachments: Manufacturers like Kohler, American Standard, and Toto often use brand-specific or unique-shaped flappers. Many standard “universal” models won’t work—always check your toilet model before buying.
- Dual-Flush and Pressure-Assist Compatibility: Dual-flush and pressure-assist toilets sometimes need specialized flappers or canister seals that do not look or install like a traditional flapper. Attempting to use a generic flapper may lead to poor flushing or constant leaks.
- Chain Placement and Lever Style: Flappers must connect properly to the flush handle lever, and the chain length and alignment matter. Some toilets have odd angles or side-mounted handles that require different linkage to work reliably.
- Universal Flapper Myth: While some flappers say they’re “universal,” that isn’t always the case. It’s best to match the new flapper directly to the old one by shape, size, and attachment style, or consult your toilet’s brand for the right replacement part.
- Best Practices to Avoid Headaches: Take your old flapper to the store, know your toilet’s brand and model, and measure the flush valve before shopping. That little bit of prep work saves time, wasted money, and the trouble of a second trip.
When to Replace Your Toilet Flapper

No toilet flapper lasts forever. Over time, regular use, age, hard water, and common tank cleaners can cause rubber or silicone flappers to warp, crack, or lose their flexibility. Even the best quality part is likely to wear down eventually—and when it does, your toilet starts to show the symptoms: running, leaking, or flushing inconsistently.
Knowing when it’s time to swap in a fresh flapper is key to keeping your toilet reliable and your water bills in check. Checkups aren’t complicated—a quick look in the tank every few months (or whenever the flush feels off) can prevent bigger problems. Replacing the flapper is an easy, cost-effective way to solve most common toilet issues, without waiting until there’s a full-blown leak.
In the next section, you’ll get a checklist of telltale signs that your flapper needs attention, from visible wear to odd flushing behavior. Keep these symptoms in mind and you’ll be ready to tackle a toilet tune-up before things get messy.
A little maintenance goes a long way—catching flapper troubles early means fewer headaches and more money left in your pocket over the years.
Top Signs to Replace the Toilet Flapper
- Discoloration and fading: If your flapper has changed from its original color or become unevenly dark, it’s likely being weakened by water chemistry and needs swapping out.
- Warped or misshapen appearance: A flapper that doesn’t lay flat or looks twisted can’t create a tight seal, letting water leak by.
- Cracking, crumbling, or sticky feel: A brittle or soft flapper is past its prime. Old rubber can crumble, leaving debris and causing failure.
- Unreliable flushing or frequent double flushes: If your toilet needs more than one flush or the flapper shuts too quickly, it isn’t working as it should.
- Persistent leaks despite other repairs: If you’ve tried fixing the chain or handle and still see leaks or running, the flapper is usually the main culprit.
Toilet Flapper Replacement Guide for DIYers
Replacing your toilet flapper is a straightforward DIY task, even for beginners. This job usually takes less than half an hour, requires only basic hand skills, and can save you serious water and cash in the long run. No special tools or fancy gadgets needed—just a new flapper and maybe a pair of gloves if you’re squeamish about tank water.
The following guide walks you through each step, from shutting off the water to removing the old flapper and installing the new one. You’ll also learn how to fine-tune the flapper chain length, which is just as important as the flapper itself for a trustworthy flush every time.
Each step is broken down so you can follow along at your own pace. Pay attention to the troubleshooting notes—they’ll help you handle common slip-ups, like chains getting tangled or flappers not sealing right the first try.
Armed with instructions and a little patience, anyone can knock out this repair and seriously cut down on water waste. Start small, save money, and build your DIY confidence along the way.
How to Replace a Toilet Flapper: Step by Step
- Shut off the water supply: Find the shutoff valve behind the toilet and turn it clockwise to stop water from filling the tank. Flush once to empty most of the water from the tank.
- Remove the old flapper: With the tank empty, unclip the chain from the flush handle lever. Slide or unhook the flapper’s side ears from the posts on the overflow tube (or unsnap it from around the flush valve seat, depending on your toilet type).
- Clean the flush valve seat: Use a towel or your fingers to wipe the flush valve opening, making sure there’s no debris or mineral buildup that could stop your new flapper from sealing tight.
- Install the new flapper: Attach the sides of the new flapper to the posts on the overflow tube or snap it in place around the flush valve seat as required. Connect the chain to the flush handle lever, leaving a bit of slack.
- Adjust the chain length: Ideally, there should be just enough slack so the flapper can close fully, but not so much the chain gets tangled or caught under the flapper.
- Turn the water supply back on: Slowly open the shutoff valve and let the tank refill. Watch to be sure the new flapper settles properly and no water seeps into the bowl.
- Test the flush: Flush several times. Make sure the flapper lifts smoothly, drops back into place, and seals every time. Look for any signs of running water or leaks, and re-adjust the chain as needed.
- Troubleshooting: If the toilet still leaks or runs after installing a new flapper, double-check you have the right size or type and inspect the flush valve seat for signs of scratches or corrosion.
Adjusting the Toilet Flapper Chain and Lever
The flapper chain connects from the flush handle lever to the flapper itself. It needs just the right amount of slack—typically about half an inch—so the flapper will open and close freely without sticking. Too tight, and the flapper can’t seal; too loose, and the chain might slip under the flapper, blocking closure or leaving you with a weak flush.
To adjust, move the hook up or down a couple of links, test a flush, and repeat until the flapper opens completely then drops back to seal the flush valve perfectly. A well-set chain and lever make for a reliable, leak-free toilet that only uses the water it needs for each flush.
DIY Toilet Repair or Call Plumbing Services
Not all toilet problems call for a plumber. Replacing a flapper is one of the most approachable home repairs around—safe, affordable, and well within the capabilities of most homeowners. With the right instructions and basic common sense, regular folks can handle flapper replacement, chain adjustment, and leak tests without breaking a sweat or their budget.
That said, there are times when calling in a professional is the wise move. Some toilet issues—like damaged flush valves, cracked tanks, or stubborn leaks that don’t quit—demand specialized tools or plumbing know-how. Knowing your limits can save money and hassle while preventing bigger problems down the road.
What follows is a clear breakdown to help you decide when it’s smart to roll up your sleeves and when it’s time to pick up the phone. Recognize when you can solve a problem yourself and when to leave it to a qualified expert, sparing your home (and nerves) from unnecessary stress.
A little DIY spirit goes a long way, but smart homeowners know when to ask for backup. With the right call, you’ll keep your home running smooth without overpaying or risking a plumbing mishap.
When to Attempt Toilet Flapper Repair Yourself
- Basic leaks or running toilets: If your toilet is running or leaking due to a worn flapper, most homeowners can safely handle flapper replacement or simple adjustments.
- No signs of tank cracks or valve damage: Visually check that the tank, flush valve, and hardware aren’t visibly damaged, broken, or corroded before proceeding with a DIY fix.
- Minimal tools required: Flapper replacement almost never requires special tools—gloves, a screwdriver, and simple replacement parts are all most folks need.
- Access to clear instructions: Reliable step-by-step guides or videos empower beginners to take on this simple repair without prior plumbing experience.
When to Contact Plumbing Services for Toilet Flapper Issues
- Persistent leaks after replacing the flapper: If your toilet continues leaking or running after a new flapper installation, the flush valve seat may be worn, cracked, or corroded—best left to a pro.
- Visible damage or cracks: Cracked tanks, broken overflow tubes, or damaged flush valve assemblies require professional repair to avoid further leaks or flooding.
- Unusual toilet designs: Specialty toilets, including pressure-assist, dual-flush, or high-end models, may need brand-specific parts and repairs beyond a simple flapper swap.
- No clear cause for the problem: If you’ve tried DIY repairs and still can’t pinpoint the issue, professional plumbers have tools and experience to accurately diagnose and fix complex problems. Remember to document any symptoms to share with your chosen expert—it’ll help them find a solution faster.